Recommended For You

PC Tricks

Latest Updates

Showing posts with label PC Tricks. Show all posts

How to know gender of you computer

9:03:00 PM

Do you want to know that what is the gender of your computer. weather it is female or male.

Here is a simple method to figure it out.

If you have read our previous in which we have teach you that how you can make your computer welcomes you.


To know your gender of your computer :-

FOLLOW THESE STEPS :


1. Open notepad and paste this code.

dim speaks, speech
speaks="Nice to see you, Your name. have a good day sir!"
Set speech=CreateObject("sapi.spvoice")
speech.Speak speaks


2. Now replace  " Your name. " with your name.

3. Now go to file and click save as.


4. click on save as all type and save it as a vbs file

for example : hi.vbs [ .vbs extension is very important ]


5. You can save it at any location.

6. Now double click on that file.

7. If your computer say that message in a girl's voice it means you have a female computer and if  your computer say that message in a boy's voice it means you have a male computer ( and you need to buy another computer . just kidding skip this !!! )


So that's it how you know about computer's gender !

Thanks for visiting !!

How to Lock a folder with password without any software

10:29:00 PM

In this Post i will show you how you can lock a folder without any software.
The main advantage if this trick is that if you locked a folder than it will also not visible and can’t be accessed through any ways.
So lets get in to it.

FOLLOW THESE STEPS :

1. Open Notepad and Paste this code.

cls @ECHO OFF title Folder Locker MeraPC.in
if EXIST "Control Panel.{21EC2020-3AEA-1069-A2DD-08002B30309D}" goto UNLOCK
if NOT EXIST MyFolder goto MDMyFolder
:CONFIRM
echo Are you sure to lock this folder? (Y/N)
set/p "cho=>"
if %cho%==Y goto LOCK
if %cho%==y goto LOCK
if %cho%==n goto END
if %cho%==N goto END
echo Invalid choice.
goto CONFIRM
:LOCK
ren MyFolder "Control Panel.{21EC2020-3AEA-1069-A2DD-08002B30309D}"
attrib +h +s "Control Panel.{21EC2020-3AEA-1069-A2DD-08002B30309D}"
echo Folder locked
goto End
:UNLOCK
echo Enter password to Unlock Your Secure Folder
set/p "pass=>"
if NOT %pass%== DevendraSingh goto FAIL
attrib -h -s "Control Panel.{21EC2020-3AEA-1069-A2DD-08002B30309D}"
ren "Control Panel.{21EC2020-3AEA-1069-A2DD-08002B30309D}" MyFolder
echo Folder Unlocked successfully
goto End
:FAIL
echo Invalid password
goto end
:MDMyFolder
md MyFolder
echo MyFolder created successfully
goto End
:End


Note : Replace DevendraSingh with your desired password.
2. Now click on save as.

3. Now click save as all type and save it as a bat file for example locker.bat


4. Now double click on this locker.bat file and you will see that it will automatically create a folder named MyFolder


5. You can save any personal files in this folder.

6. Now again double click on that locker.bat file and command prompt will open type Y and press enter and you will see that your folder is not visible now.


7. To UNLOCK just double click on that locker.bat file and enter your password and hit enter.

8. if someone type wrong password than it will exit automatically.

So that’s it! hope you find this helpful.
Thanks for visiting !

How to sign up multiple times to a website with one/same gmail account

10:22:00 PM

In this post i will teach you a very simple technique to sign up to a website using one single gmail address.
Some on you may know that if you add dot [.] in your gmail address then gmail will treat it as same gmail address means you will able to receive on this email address as well but most of the website treat them as a new email address.
So the tricky part is just add a dot [.] in your email address and you have a different email address and you can sign up using that as well.

For example

if my gmail address is
kunwardevendrasingh@gmai.com
than i can use :
kunwar.devendrasingh@gmail.com
kunwardevendra.singh@gmail.com
kunwardev.endrasingh@gmail.com
kun.wardevendrasingh@gmail.com

i can add . ( dot ) anywhere on my email address
Now if i use these email address than they will treat them as new email address but gmail will not.
Note : please note that some website will also treat them as same email address such as facebook.
Well hope you found this helpful.
Thanks for visiting.

How to activate window 8.1 Parmenanently

10:12:00 PM
i receive lot’s of request that how you can activate windows 8.1 .
well you can use Microsoft Toolkit for this task and i provided download link below.
No the question is how you can use it.
Steps are very simple just follow me. :)

FOLLOW THESE STEPS :

1. Double click on Microsoft Toolkit.exe.
2. then user account control window will pop up just click YES
UAC
3.Now Microsoft Toolkit will open there is two option one for ms office 2013 and one for windows 8.1 click on windows icon.
Miscrosoft Tool kit
4. Now there is 4 Tab Main | Activation | Product Keys | License Backup.  if you already have activated window 8.1 the i will recommend you to back up your license other wise move to step 5.
5. Go to Product keys  Tab and then select Windows 8.1 in Product lists. and then choose windows edition and then click install.
Installing Product Keys
Note : If you don’t know which edition you currently have the Go to system properties [ right click on my computer > properties ]
image
6. No Go to Activation Tab First Click on Tools and select Auto KMS and click install. Once you install KMS then simply click on Activate.
Activate Window 8.1
7. If you have done everything as i shown you your will a message like this !!!!

image
8. No simply restart your computer and now you can check in system properties !!  It is activated !!!
Activated Window 8.1

Here is the link to download Microsoft Toolkit :


So these simple steps can easily activate your windows 8.1 !!! if you are still facing any problem than you can comment below.
Thanks for visiting !!!

How to Send exe Files Through gmail or any other mail service

3:00:00 AM

 Today in this post i am going to show you how you can send executable file  through gmail or any other email sercive.
For security reasons gmail doesn’t allows you to send windows application or .exe extension  files .
Well there is alternate ways to send the exe files and we will discuss them too!!


Top 3 Methods

1. Uploading File to a File Host :

This is one of the best and legal way of sending an exe file through email. what you need to do is simply upload your .exe file to any file hosting service like google drive, drop box or mediafire. and simply give the link to the recipients.

2. Manually Change the File Extension :

You can easily rename .exe to any other name like .jpg or .mp3 and can send through email.
But generally windows hides the extension of known file type and you will enable to rename the file.
So

Show file extension of known file type Follow these steps :

1. Go to My computer Then View and then folder options
2. Go to View Tab and then you will see an check box that Hide extensions for known file type simply uncheck and press ok. and now you can rename any files.
image

Now You can rename you .exe file to any other format and can send it through email. But please note that you must inform recipient about this!!!

3. Add An “Imaginary” File Extension  :

Some time even you forget the actual file extension so this might help you.
Simply add imaginary file extension for example if you file name is Simple.exe then rename it to Simple.exe.remove and you are good to go.

So guys these are some trick that might help you to send .exe format file through email.
Thanks for visiting !!!

How to temporarily open 2 or more accounts of facebook or gmail in same browser

8:25:00 PM

Here is trick which allows you to open two or more facebook or gmail or any account in same browser.
For example i used google chrome and at the same time i need to access my another gmail account but i am too lazy to install another browser or accessing internet explorer.
So here is a cool trick some of you may know this.

Follow This Step :

1. Open Google Chrome.
2. Press Ctrl+Shift+N
3. This will open  a new window but this is an incognito tab.
image
4. in this tab you can open your another facebook or gmail account without signing out isn’t is cool?
5. when you exit from this tab you will automatically signed out from the website.
What is actually incognito Tab
Well incognito tab allows you to browse secretly in other words
“Pages you view in incognito tabs won’t stick around in your browser’s history, cookie store, or search history after you’ve closed all of your incognito tabs. Any files you download or bookmarks you create will be kept.”
Note : Going incognito doesn’t hide your browsing from your employer, your internet service provider, or the websites you visit.

incognito Tab or safe browsing in other browsers

1. Google Chrome

--> Menu > New Incognito  Window
--> Ctrl+Shift+n

2. FireFox

--> --> File > New Private Window
--> Ctrl+Shift+P

3. Internet Explorer

--> Safety > InPrivate Browsing
--> Ctrl+Shift+P

4. Opera

--> Menu > Tabs and Windows > New Private Tab
--> Ctrl+Shift+N

5. Safari

Safari > Private Browsing

Well Hope you guys enjoy this trick. well it helps me a lot. when i goes to my friends house and when i temporary open my facebook or gmail account it works very well.
So thanx guys for visiting

How to HIDE a folder

11:40:00 PM

Today in this post i will teach you that how you can HIDE a folder. but before getting start i want to tell you that hiding folder (or files) using this trick only works when you have selected option like don’t show hidden folder. This trick is works fine but if you are looking for a  Advance method for hiding files then you can follow this link.

So lets get started in this trick what we exactly do that we change properties of a folder or a file. and make it hidden.


FOLLOW THESE STEPS:

1. First of first right click on the folder or file which you want to hide and choose properties.


2. And then under attributes you will see a check box for Hidden check this and hit apply.


Hiding a Folder or file


3. After it you probably see a menu like this.


Confirm attributes change dialogue box


4. Select these option if :
If you only want to hide that particular folder < Note : sub folder and files can be seen in search if you use this option >
If you also want to hide folder, sub folder and files then choose second option <  i will recommend you this option >
And you are done.!!!

How to Unhide Folder/Files

1. The process is same just uncheck the check mark before hidden name in the properties menu.
and you are ready to rock!!!

Now here is the Most important part.. this trick only works  if you have selected don’t show hidden files. Now you may ask how do i set this up.
So..


1. Go to control penal and click on the  address bar click on the small triangle and choose  all control panel items.


all control panel items


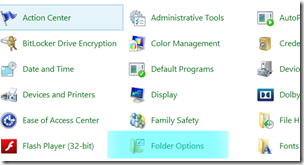
2. Now you will see a option called  Folder Option click on that.


folder options


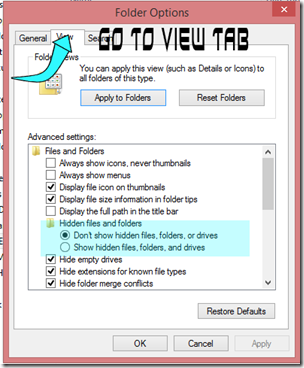
3. Now Go to View Tab and there under Hidden files and folder you will see two options.
Now choose them like this
1. If you wish that your hidden files not visible in window explorer and also not visible in search result than choose 1st option
2. If you wish that your hidden files visible in window explorer and also visible in search result than choose 2nd option.
image


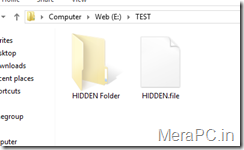
3. If you choose second option than you will see your hidden files like this.


Hidden Files


Okey so This is my post about how to hide a folder or a file. At the end of the post you know that if we have not enabled the option that hide hidden file than this trick not works. and your files and folder will seen in explorer and search result.
There is an another way to do this and than works perfectly. So i will recommend you to see that post Hide a file or a folder using command prompt.

Thanks for visiting !! 

Transfer Files between your PC and Android Mobile using Wi-Fi

1:37:00 PM

welcome to merapc.in today i am going to tell you about some apps which allows you transfer files between your pc.
Some of you may use data cable. but sometimes it will very helpful to use this method.

The benefit of wireless is that it is easy to connect and there is fast transfer of files. Here are the few wireless apps which have highest reviews in Google Play store and that will help you to Transfer Files between PC and Android wirelessly


Apps to Transfer Files between PC and Android

1.Airdroid :


Airdroid is an top app to Transfer Files between PC and Android. It is available at that size of 6.4 MB and requires Android 2.1 or up. It has the highest rating for wireless data transfer. It is easy to use and even looks much pretty. The Key feature supported by this app is that— desktop SMS service, wireless transfer of files and media data, phone locating technique app management, camera and screenshots.


2.ES File Manager :

Its size varies with devices. It is commonly known as an Android File Manager app but can also be used to transfer files wirelessly, select “Remote Manager” under the “Fast Access” list, you can find local network you are connecting to. Tap “Turn on”, find the given ftp address, then input the ftp address in the address bar of computer on your pc. As long as you get used to this app you will find it more than easy to use it.


3. 3CX Droid Desktop :


It is available at the size of 2.8 MB and requires android 2.0 or up. It is not as easy to use. The first time you run this app, you are required to set service port and password for your connection. Tap “start server” an IP address is generated for your device, input The IP address and password on computer browser, there will be a page displayed which looks similar to desktop.
3CXDroid also supports USB mode, Desktop SMS, Gallery Viewer, Media Player, FTP Server, WiFi Keyboard, Webcam, Screen Capture, Contact Manager, Remote Call, Wallpaper Utils, APK Web Installer, Terminal Emulator, Logcat, etc.


With the help of such apps our work gets easier and better, and we don’t need the maximum use of USB or any other wiring, which make these apps unique and is greatly appreciated by the users. and the speed is also good of file transfer.
Hope you guys find this post useful.
Thanks for visiting.!!!

5 Best Youtube Trick

1:35:00 PM

Today i am here to talk about youtube tricks. as you know that youtube is the best online streaming website and it also  provide you features to upload your own video.

people also make some good money from youtube.

so lets walk about some cool youtube tricks.

 1.Set a Specific Start Time:


Many times you wish to share some video on Youtube with your friends but you want them to focus on some specific part of video and then you inform them the exact time duration from where they should start watching it. But it is possible to share video with customized or specific start time easily. All you need to do is adding some simple code in URL.
Lets say you are watching video on following URL :
http ://www.youtube.com/watch?v=U8STgCviLe0
Now you may simply add ” #t=01m02s ” at the end of this URL while sharing this video and it will start playing video from 1 Minute and 02 Seconds instead of it’s initial position.

2.Set Auto Replay For Video:


Just like a Windows Media Player where you can loop and replay your favorite audio/video song infinite times , you can do the same with Youtube. All you need to do is replace Youtube with infinitelooper in the URL bar and hit enter.
Original URL : http://www.youtube.com/watch?v=U8STgCviLe0
Modified URL : http://www.infinitelooper.com/watch?v=U8STgCviLe0
It will redirect you to a new website where you can replay your video as many times as you want. It also allows a special feature , you can set a selected area for looping which means only some special part of video can be set for looping. This is simply great isn’t it ?

3.Watching Video With Slow Internet Speed:


Youtube is taking care of their all type of visitors from many different countries as well as of many different kinds of internet connections including very slow speed video streaming. Youtube provides a great feature called Feather Beta which allows users to enjoy videos on Youtube even if they have very slow internet connection.
Feather beta feature removes the bytes which restricts the browser speed of streaming video hence unleashes full capacity of browser to allow streaming at rapid rate. To Use This Awesome Feature you may Click here And click on Join the Feather Beta feature.

4.Search Accurate Keyword:


Youtube is biggest video channel on internet and it gives birth to complexity that whenever you search for any video title , as a result you get thousands of results for same keyword. This makes it really challenging to find that video which you really want to watch. But there is a simple trick by using which you will be provided with videos having exactly same keywords as you have entered in search bar and no inappropriate stuff.

5.Always Play Videos In HD:


If you have a high speed internet connection and you love watching videos in HD then this trick is for you. Most of the time videos on youtube channels have default settings and when you play them , they start with low quality in order to stream at faster rate but if you want all videos to be played in HD by default when you click them you can simply install an Add-on in your browser named Magic Actions For Youtube . This Add-on is available for Mozilla Firefox as well as google chrome . Once you installed this Add-on in your browser enable the Auto HD option.
_____________________
 
Hope you guys found this tricks useful for you.. and make sure you like us on facebook..
Thanks for visiting !!


Top 5 Best Hack for Window Explorer

1:32:00 PM

Today we will talk  about windows tricks.
Every Windows User is well aware of What Windows Explorer is. Windows Explorer is also known as File Explorer particularly in Windows 8. Window’s File Explorer is something we all Use on daily basis. So why not try to make it more Productive and Efficient with some Cool Hacks. Earlier We Saw How to Get Back Start Button In Windows 8
 
Here in this article i have listed 5 Best Windows Explorer Hacks that you Must be aware of to make your Files management Experience more easy and efficient.
 
So lets get started
 

1) Edit Send to Menu

: Windows By Default allows you to Send any file or folder to Desktop, or Compress it or Mail it to the Recipient of your Choice, We Can Edit this Send to Menu to display things that you want to display, you can add or delete anything from this menu Easily.
Navigate to C:\Users\*Username*\AppData\Roaming\Microsoft\Windows\SendTo.
Appdata Folder is Hidden by Default, First unhide it by Clicking on View>Option>Folder option>View> Check show hidden files,folders and Drives.
OR
You Can alternatively open Send to Folder with Run Command, Press Win+R key to open up Run Dialog, and type in shell:sendto and press Enter.
There You Can see Some Similar Files That were showing you in the Send to Menu. To Remove any Option you can delete that File from Send to folder. On the other hand to add Something to Send to Menu, Just Copy the folder that you want to show up in Send to Menu and Paste it there in that Folder. Now Check the Send to menu to See the Changes. All Done !!!

2) Add Copy to and Move to Folder options

: We can add “Copy to Folder” and “Move to Folder” to your Context Menu. Windows Don’t Provide these options by default but we can add with a simple Registry hack.
To add Copy to and move to  folder Option : Click here to Download Add_Move_To_Folder.reg File,
And Click here to Download Add_Move_To_Folder.reg file. These files are  small regsitry file for windows that will help you to add Copy to folder and Move to Folder option. Once downloaded, Double click on it, Click Run when Prompted. then you may be asked to click on yes and ok Couple of times.
Best WIndows Explorer TricksWhen Everything is done, Right Click on any folder and check if its Showing Move to and Copy to Folder options. You Can see Move to and Copy to Folders are now added to your Context menu like mine.
Best WIndows Explorer
 Tip: Hold Down CTRL key , Drag and drop Source file to Destination to Copy it. And Hold down SHIFT key, Drag and Drop Source file to Destination to Move it.

3) Change Default Folder

: Whenever you Launch Windows Explorer in windows 7/8, it opens up Library folder, but may it its not that usefull for us or we need some other folder to open up when we Click on taskbar’s Windows Explorer Shortcut. So in this hack we will Change Windows Default Folder  to our Downloads Folder instead of library.
To Start with we will Right click on the Windows Explorer or File Explorer for Win 8 Users from the task bar icon. A list will show up, Now again Click on Windows Explorer (File Explorer) and Click on Properties.
You can see a Dialog Box appears, There you Can see target path is somewhat like AppData\Roaming\Microsoft\Windows\Libraries all we have to do is change this path to your desired folder that you want to open up everythime you launch file explorer.
As here we are going to Change it to Download Folder we will change the path to C:\Users\*Username*\Downloads. Click OK and we have successfully changed the path now.

4) Add tabs to File manager

: We will be Using a Third Party tool Which is QTTabBar (2.9 mb) to Get advantage of Tabs, just like we have tabs in our Browsers. It not only Facilitates with the tabs but also provides many other usefull features that shows up in you file explorer
You will be asked for a Reboot in order to make changes after the installation process Completes.


5)Better File Copying Speed: Windows have made some efforts in windows 8 to improve Copying Speed. Copying FIles is better in windows 8 as compared to older versions but yet its slow and many times it Conflicts, so We will be Using TeraCopy to Takeup this task and its Fast and Effective. What it does is, it  Eliminates windows Default File-Copy Dialog  and gives us a better one.
After Installing TeraCopy, Whenever you Will Copy and paste, TeraCopy will Come into Action and do the Task for you much Faster. it also adds itself to Context Menu as an Option if in Case you prefer to Use it only when you Want to .

So thats it.
Thanks for visiting!!


Cool Google Tricks You Must Know

1:30:00 PM

Today i am here to talk about some really good and interesting google tricks.
Hope you like it.
so lets get started.

1. Definition:

There is no longer the need to type a word and then visit dictionaries online to find its meaning. Using this trick, all you need to do is simply write “define” followed by the word whose meaning you want to know, This Cool Google tricks Come very handy if you use it Effectively.
You will be amazed to see that the meaning of the word, along with its synonym and antonym will be displayed on the search engine. For instance, type “define reach” and then press enter. The meaning of the word will get displayed on your screen.

2. Phone number lookup:

It is now possible to trace mobile number by simply typing the full number along with the area code. This will display the address as well as the name of the person under whose name the number is registered.(Doesn’t Work anymore)
This was the Most helpful thing i have seen from all the Google Tricks. Unfortunately its not working anymore

3. Atari Breakout:

Only Few Know about this trick and so I think this is the Best Trick amongst all the Google Tricks. All you have to do is Type Images.google.com in the address bar of your browser to open up google images. Now type “Atari Breakout”  and Press Enter.
You will Definitely Be amazed to see what happens next. It is Only Fair to Add this Trick in my list of Cool Google Tricks.

5.Find movies and weather:

All you need to do is type “movies” or “weather” in the search box followed by the area code or name of the state in order to display corresponding information regarding it. For instance, if you type “weather 12345”, weather conditions of the corresponding location will be displayed.
Also, on typing “movies 12345”, the details of all the movies currently running at that place along with number of shows will get displayed. this is another Cool Google trick then i like and use.

6.Paged linked to you:

You can now find the web pages and links that are connected with your blog or website. Simply type “link” followed by the URL of your website and you will get a list of all the pages connected with your website.

7.Tracking airline flights and packages:

This is another handy Google trick. You can now find the arrival time and status of a flight by simply entering the name of the airline and corresponding flight number.

8.Calculator:

You can use the Google search engine as a real time calculator as well. For instance, if you will type 25+25 in the search box, 50 will get displayed.

9.Stocks:

All you need to do is type the stock symbol on Google and you will get information about stock rates, links as well as charts. For instance, to know about the stock details of “Microsoft”, you have to write “msft” on Google.
10.Finding PDF results only:
To get results matching only a certain file type, simply type “fileType:” after your search. Online manuals can be found using this trick from Google.

11.Local search:(Bonus 1)

You can now find local restaurants and other landmarks with this trick. One of the best Google tricks according to me. Simply go to “Google visit” and type the name of the area and the place which you want to find. It is capable of displaying all local landmarks and places.

12. Use Google as Timer (Bonus 2)

You Can use Google Search to Set Timers too. If you want to Complete Certain Task in so and so minutes or hours then You can simply start Timer. This is one of the Most amazing Google Tricks that very few people are aware of. All you have to do is Open a new tab in your favourite Browser and Enter the Term “Set timer 10 minutes” and click enter.
As soon as you Hit enter you will see google timer is already started.  In this Example i have used 10 minutes but you can always change it to anything.
For Eg: if you wish to set a Timer for 1 and half hour then you will enter thie term “Set Timer 90 Minutes” and Hit Enter.
___
Thats it… these are some collection of good google tricks.. Hope you like it.
Thanks for visiting !!


Window 8 and 8.1 Best Tricks Collection

1:30:00 PM


Some of you may love the new features in windows 8/8.1 . With many of the controls for launching programs and accessing settings tucked away, many deemed it as a flop especially in the ‘ease of use’ department. So today i am going to share some cool tricks for window 8/8.1 .


Cool Windows 8 Tricks


1.Enable Metro-Style Internet Explorer To Play Flash Content:

Windows 8 comes with two versions of IE – one is on the Classic desktop and the other one is on theMetro interface. The problem with the latter is that it won’t play flash content if the website it’s on is not listed on Microsoft’s list of trusted websites.
You can wait for Microsoft to update their compatibility list and add your site (don’t hold your breath though). Or you can follow these instructions:

First, go to C:\Users\(Your User Folder)\AppData\Local\Microsoft\Internet Explorer\IECompatData. Next, find the XML file named “iecompdata”, and open it with a text editor. Find the line of code which starts with the entry “Flash”, enter the URL of the website, save the changes to the XML file, and delete Metro IE’s browser history.
Once the site is added, you can now play or use its flash content with Metro IE.

2.Simultaneously Use Windows 8 Apps And The Classic Desktop:

Let’s say you’re using dual monitors. The operating system automatically uses the main screen while the secondary screen hosts the desktop. This setup makes full-screen multitasking on both interfaces a lot easier – Windows 8 apps for the main screen and desktop for the secondary screen, perfect?
In paper, it’s all good. However, as soon as you start using the desktop, the main screen’s Windows 8 apps disappear and switches to desktop!
However, there’s a workaround. On your main monitor, use Windows 8’s split-screen ‘snapping’ feature to run the desktop and a Windows 8 Store app together. It looks silly at first since the desktop takes up a very small slice of the screen’s left side while the app takes up the rest.
However, after you set and use your secondary monitor for a full desktop view, viola! You now have an arrangement where a Windows 8 app and the desktop can peacefully coexist. Not to mention both windows are spacious enough to use.

3.How To Create A Picture Password

Want to keep your PC secure without setting up a complex password that you can vaguely remember? No problem! In Windows 8, you can create a picture password to keep your system secure minus the hassle of trying to remember which special characters you used.
This is one of the best Windows 8 Tricks to create a Picture password. Here’s how: First, press the Windows Key + I combination. This will take you to the settings charm. Next, proceed to “Change PC Settings” located at the bottom right of the window and go to the Users Tab.
Under “Sign-In Options”, click the “Create A Picture Password Button”. You will now be asked to choose any picture and define three gestures anywhere on it. It can be any combination of circles, swipes, or clicks. After confirming it, the picture password will be set.
Take note, the gestures do matter so remember them well. So maybe you can’t really get away from remembering stuff when accessing your PC? But hey, that’s a lot easier than trying to recall a 12-character password!

4.Give Your Windows 8 A “Hot & Fresh From The Factory” Feeling :

If Windows feels a little too slow for convenience, you can perform a Refresh. In the previous versions of Windows, you have to backup all of your files, device drivers, etc. before you can perform a fresh install.
It’s time-consuming and it’s tedious!
Not with Windows 8. You can perform a refresh without the need for backing up your data. First, go to Settings and click the tab “Change PC Settings”. Go to the “General” tab in the next window, and you should find the “Refresh Your PC Without Affecting Your Files” section.
Select “Get Started” and hit “Refresh”. Sit back, grab a cup of coffee, and relax. After a few minutes, your PC will restart and you now have a refresh and reinvigorated Windows 8 or windows 8.1 !!!
 
So these are some cool tricks for windows 8/8.1 . hope you find them useful.
Thanks for visiting !!


How to Access a Windows Desktop from Your SmartPhone or Tablet

1:29:00 PM


you can Access a Windows Desktop from Your SmartPhone or Tablet. IPads and android tablets or Smartphone can’t run windows app locally, but with this you can remote your windows desktop, even with a physical keyboard. Many apps has been developed and launched like Microsoft remote desktop app, TeamViewer for Remote Control, among which Microsoft app is mostly used for professional use while the other app can also be used for personal uses.

Microsoft’s remote desktop app :

This app has reduced the work load from one’s head of staying in the home and working all the day and cancelling the vacations and many more just because of the work info is available in your PC. With Microsoft remote desktop app, you can connect to your work resources and remote PC from anywhere you feel like working. This app is mostly used for business and professional use rather than the personal use.

Features of this app :
  • Access your desktop with your phones easily.
  • Rich multi-touch experience with remote desktop protocol (RDP).
  • It has an outstanding feature or technology, namely Network Layer Authentication which secure connection to your data and applications.
  • High quality video and sound streaming.
Review for this app :This app is friendly for the business related persons or for the professional use but not so friendly for the personal use.

TeamViewer for Remote Control:

This app is friendly for the personal use too no matter wherever you are, rather than controlling your own computer you can also remotely troubleshoot your relatives PC.
Features :
  • Access to computers (windows, Mac, Linux) is possible also during a telephone call.
  • Transfer the files from your PC to phone or from phone to PC.
  • Automatic quality adjustment.
  • Remotely reboot the computer.
  • TeamViewer free is for private use only e.g. to access or solve your or your friends computer problems.
All you have to do is Download an Install Teamviever on Your Desktop and Mobile, after installing on your smartphone you will have to login with the details that teamviewer window displays.
Other Options: Other than these two apps you surely have other options too if you are not friendly with both of them.
Splashtop: This is another popular remote desktop app that people reportedly has said that it is faster. But unfortunately this is not a free app as it may cost you around $20 at regular price. And to use it over internet you need to buy an additional “Anywhere access pack”. This app can be used or purchased if you don’t mind spending money or if you need a faster app to complete your work fast.
 
You can use this app for either personal or professional. It’s all depends on you. So hope you guys find this post useful.
Thanks for visiting !!


What is Trojan horse virus and how to Remove it

1:27:00 PM

Today i am here to talk about some serious stuff. Virus!!!
Are you facing virus threats on your computer? Is your computer behaving abruptly or are you the victim of a disk crash?  Is your computer hacked by a Trojan horse virus attack? A Trojan horse virus attack is one of the most dangerous threats to your computer and needs to be fixed immediately. If it is not protected on time, then the virus can lead to failures in connecting to the IRC network or even worse can lead to your computer hacking and then your computer might be used by some anti social elements in shaping some criminal attacks. that is the worst thing in the world isn’t it..?

first of all i would like to tell you about Trojan horse virus.

About Trojan Horse Virus :

It is a security breaking program, also malicious to your computer and is disguised in some benign object. It can be downloaded unknowingly through any document, executable, zip, movie or music file and unleashes a dangerous malware into your drive on executing the files.
This malware can completely wipe your disk or can even send your credit card details and passwords to any stranger on the web. It is not at all operating system specific. It can affect any operating system but affects windows more promptly due to its popularity and weaknesses. This is a silent attacker and many people come to know about its attack after it has infected other connections.

How to Remove Trojon Horse Virus:

  • There are many ways one can avoid itself from being a victim of this malicious virus but the best is to be attentive in downloading and executing files form an unknown source or person and also doing a background check of it, if downloading from a known source. But if you have already been a victim of it then you need to take immediate steps to remove it from your drive before it creates some major problem. You need to repair and then reformat your system completely to remove all malwares which may take from several hours to several days of time.

It is quite possible that the removal has not been done properly and may lead to coming back of the virus again and again in such cases you must take stronger measures to curb this problem.
  • Firstly you need to have anti-virus software installed in your system and that too an updated one or else they will miss the latest species of Trojan horse. Anti-virus software helps prevent the system from many Trojan viruses. Then make sure you have updated your operating system as well with all new security patches.
  • One may also have to install Anti-trojan programs like The Cleaner which specialize in Trojans. Once it is installed reboot your computer in safe mode and use the cleaner to clean all registries and drives for any Trojan suspected. Make sure the internet is unplugged while cleaning. Once cleaning is complete reboot the system again.
  • After using the cleaner make sure that you have updated your operating system and have changed all the passwords. Once the system is repaired make sure to take a backup of every data and reformat the system completely.

That’s it guys.. i am sure that this will help you a lot. Make sure you like us on facebook.
Thanks for visiting !!


How to Enable Hibernate In Windows 8/8.1

1:24:00 PM

As you know that window 8/8.1 user interface is completely changed from it’s previous version of windows like windows 7 or Xp.

And Couple of things have Even Disappeared From Windows 8 like Start Button and Hibernate Option. Probably the Reason Microsoft Disabled Hibernate option is Because Windows 8  Boots up and Shuts down Faster then The Older Versions.

In this post i will teach you then how you can Enable Hibernate in window 8 or 8.1 .

What is Hibernate ?

first of all you must know that what is exactly hibernate .
Hibernation is powering down a computer while retaining its state. Upon hibernation, the computer saves the contents of its random access memory (RAM) to a hard disk or other non-volatile storage. Upon resumption, the computer is exactly as it was upon entering hibernation. When used to save power, hibernation is similar to sleep mode and saves more power at the cost of slower resumption. i personally use hibernate mode.
Hibernate Option is Actually Hidden in Windows 8, We Can easily Unhide it and Enable it. Just Follow The Below Simple Steps to Enable Hibernate In Windows 8

FOLLOW THESE STEPS :

Step 1: Press Win + W key ie: Windows key and “W” key to open up Setting search menu. Then Type “Power” , Windows will Show you Few Results, You have to Click on “Power Option”


Step 2: Now From the Left Pane, Click on Choose What the Power Button do.


Power button action 


Step 3: Then on Next Screen Click on  Change Settings that are currently Unavailable.


Changing settings


Step 4:  Now Scroll Down to “Shutdown Settings” Section, and Check  Hibernate box to Enable it and Click on Save Changes.


Step 5: Everything is done, Now next time whenever you need to Hibernate your PC, just Move your Mouse pointer to right corner of your screen to Show up Charm screen, Click on Setting> Power.


Enable hibernate


You will notice Hibernate Option added there. So in this Tutorial we Saw What Hibernate is and how to Enable Hibernate In Windows 8, Hope this Helps you .


Hibernate button in widow 8 or window 8.1

 
Hope you guys found this post helpful. Keep visiting.
Thanks for visiting !!


How to re arrange taskbar items

1:11:00 PM

Today i will teach you that how  you can re-arrange taskbar items. as default taskbar pinned items float to the left but we can put them in right or in the center like in MAC.
This trick works fine in window 7,8,8.1 i have not try it in window 95 but you can :-p.
So the steps are simple just follow me.

FOLLOE THE INSTRUCTION

1. First of all you need to create a folder anywhere but be careful Do not delete this or you can also use any folder.


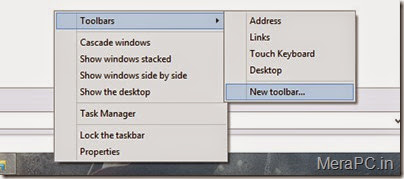
2. Right click on the taskbar  and click toolbars and then New toolbar. and also make sure then you have uncheck  lock taskbar.


adding new toolbar


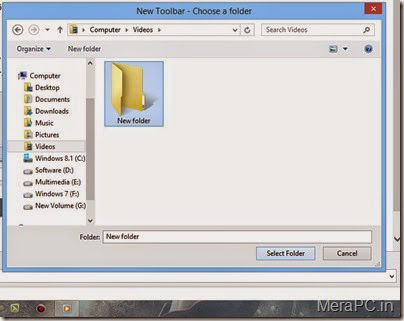
3. Now select any folder and make sure you don’t delete it.


Adding folder as a toobar


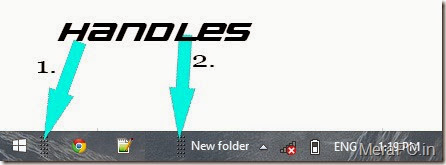
4. Now it should look like this . and  also you will see two handle like this


rearrange taskbar item step 4


5. Now here is the tricky part. drag the handle no. 2 to the left to very end and it will look like this


rearrange taskbar


6. And now put this handle(red) to the left and achieve you favorite position


4


7. for example mine look like this.


Taskbar after rearranged


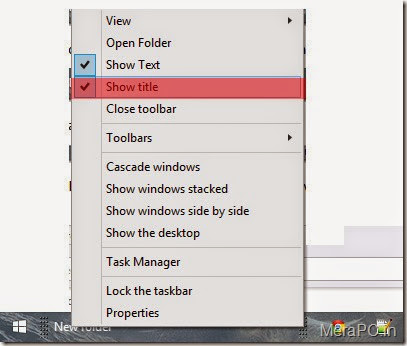
8. Now there is a problem you can see the new Folder name and there is no use of it so what you can do right click on it and uncheck show title


Hide the name of folder


and every thing is ready and now you can check lock the taskbar so you will not lose your setting by accidently.


Here is a look for the final product :-p


re arranged taskbar final
So guys that’s it and now you have taskbar items in middle or in right.
Hope you enjoy it and also found this useful and also share it to your friends.

Thanks for visiting !!
 
Copyright © Mera PC. Blogger Templates Designed by OddThemes