Recommended For You

PC Tricks

Latest Updates

Showing posts with label PC Customization. Show all posts

How to know gender of you computer

9:03:00 PM

Do you want to know that what is the gender of your computer. weather it is female or male.

Here is a simple method to figure it out.

If you have read our previous in which we have teach you that how you can make your computer welcomes you.


To know your gender of your computer :-

FOLLOW THESE STEPS :


1. Open notepad and paste this code.

dim speaks, speech
speaks="Nice to see you, Your name. have a good day sir!"
Set speech=CreateObject("sapi.spvoice")
speech.Speak speaks


2. Now replace  " Your name. " with your name.

3. Now go to file and click save as.


4. click on save as all type and save it as a vbs file

for example : hi.vbs [ .vbs extension is very important ]


5. You can save it at any location.

6. Now double click on that file.

7. If your computer say that message in a girl's voice it means you have a female computer and if  your computer say that message in a boy's voice it means you have a male computer ( and you need to buy another computer . just kidding skip this !!! )


So that's it how you know about computer's gender !

Thanks for visiting !!

How to make your pc welcomes you

8:53:00 PM

In this post i'll show you how you can make your computer welcomes you with a message like "Welcome to your PC, Your name."

so each time when you start your computer it will say this message.

So how exactly you do this.

FOLLOW THESE STEPS :


1. Open notepad and paste this code.

dim speaks, speech
speaks="Welcome to your PC, Your name"
Set speech=CreateObject("sapi.spvoice")
speech.Speak speaks
2. Now replace  "Your name" with your name.

3. Now click file and save as


4. Now here is important step  click on save as type and click all types and then save it as a .vbs file .
for example : hi.vbs [ .vbs extension is very important ] 


5. Now if you double click on that file it will that message in this voice. but how you make your computer so it will say it when your pc starts?

6. Here is the solution. copy this file to


C:\Documents and Settings\All Users\Start Menu\Programs\Startup  [ if you have windows XP ]


C:\Users\ {User-Name}\AppData\Roaming\Microsoft\Windows\Start Menu\Programs\Startup [ if you have window vista,7,8,8.1]

7. That't it Now each time you start you computer it will say that message. and welcomes you !!

8. You can delete that vbs file from above location to undo this.

Note : For best result make some settings :


1. Right click on desktop and click personalize.

2. Now click on sounds


3. Under sound scheme select No sound  and hit apply


6.If you wish to save your Previous Sound Scheme, you can save it by clicking Yes in the popup menu.

And done!

So this is how you can make your computer welcomes you in its voice.

Thanks for visiting !!

How to Lock a folder with password without any software

10:29:00 PM

In this Post i will show you how you can lock a folder without any software.
The main advantage if this trick is that if you locked a folder than it will also not visible and can’t be accessed through any ways.
So lets get in to it.

FOLLOW THESE STEPS :

1. Open Notepad and Paste this code.

cls @ECHO OFF title Folder Locker MeraPC.in
if EXIST "Control Panel.{21EC2020-3AEA-1069-A2DD-08002B30309D}" goto UNLOCK
if NOT EXIST MyFolder goto MDMyFolder
:CONFIRM
echo Are you sure to lock this folder? (Y/N)
set/p "cho=>"
if %cho%==Y goto LOCK
if %cho%==y goto LOCK
if %cho%==n goto END
if %cho%==N goto END
echo Invalid choice.
goto CONFIRM
:LOCK
ren MyFolder "Control Panel.{21EC2020-3AEA-1069-A2DD-08002B30309D}"
attrib +h +s "Control Panel.{21EC2020-3AEA-1069-A2DD-08002B30309D}"
echo Folder locked
goto End
:UNLOCK
echo Enter password to Unlock Your Secure Folder
set/p "pass=>"
if NOT %pass%== DevendraSingh goto FAIL
attrib -h -s "Control Panel.{21EC2020-3AEA-1069-A2DD-08002B30309D}"
ren "Control Panel.{21EC2020-3AEA-1069-A2DD-08002B30309D}" MyFolder
echo Folder Unlocked successfully
goto End
:FAIL
echo Invalid password
goto end
:MDMyFolder
md MyFolder
echo MyFolder created successfully
goto End
:End


Note : Replace DevendraSingh with your desired password.
2. Now click on save as.

3. Now click save as all type and save it as a bat file for example locker.bat


4. Now double click on this locker.bat file and you will see that it will automatically create a folder named MyFolder


5. You can save any personal files in this folder.

6. Now again double click on that locker.bat file and command prompt will open type Y and press enter and you will see that your folder is not visible now.


7. To UNLOCK just double click on that locker.bat file and enter your password and hit enter.

8. if someone type wrong password than it will exit automatically.

So that’s it! hope you find this helpful.
Thanks for visiting !

How to HIDE Files and Folder using command Prompt

11:42:00 PM

But in that post i have told you that if you have selected the option called show hidden files and folders than your files and folder will be seen in search and explorer.

But using this trick you can completely hide your Files or folder and the best part of this trick is that you need No Software  to do this.
So Lets Get Started

FOLLOW THESE STEPS :

1. Open run command. ( By window key + R and type cmd ) ( or press window key and search cmd < window 7,8,8.1> )
2. Now type this code
attrib +s +h E:\TEST
Note : Replace E:\Test
with your address of destination folder or file
like E:\TEST\New Folder
or E:\TEST\File.txt
How to Hide a folder
Now you will see that your file or folder is hidden completely and it will not seen in search result.

How to UNHIDE

1. instead of using +s and +h use –s and –h. For example attrib -s -h E:\TEST

How to UnHide a folder
Note : Replace E:\Test
with your address of destination folder or file
like E:\TEST\New Folder
or E:\TEST\File.txt
So Hope you guys found this post useful. This trick is simple and works perfectly. but both have their own importance.
Thanks for visiting !!

How to HIDE a folder

11:40:00 PM

Today in this post i will teach you that how you can HIDE a folder. but before getting start i want to tell you that hiding folder (or files) using this trick only works when you have selected option like don’t show hidden folder. This trick is works fine but if you are looking for a  Advance method for hiding files then you can follow this link.

So lets get started in this trick what we exactly do that we change properties of a folder or a file. and make it hidden.


FOLLOW THESE STEPS:

1. First of first right click on the folder or file which you want to hide and choose properties.


2. And then under attributes you will see a check box for Hidden check this and hit apply.


Hiding a Folder or file


3. After it you probably see a menu like this.


Confirm attributes change dialogue box


4. Select these option if :
If you only want to hide that particular folder < Note : sub folder and files can be seen in search if you use this option >
If you also want to hide folder, sub folder and files then choose second option <  i will recommend you this option >
And you are done.!!!

How to Unhide Folder/Files

1. The process is same just uncheck the check mark before hidden name in the properties menu.
and you are ready to rock!!!

Now here is the Most important part.. this trick only works  if you have selected don’t show hidden files. Now you may ask how do i set this up.
So..


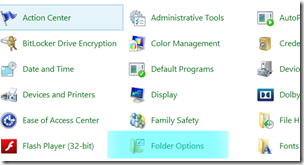
1. Go to control penal and click on the  address bar click on the small triangle and choose  all control panel items.


all control panel items


2. Now you will see a option called  Folder Option click on that.


folder options


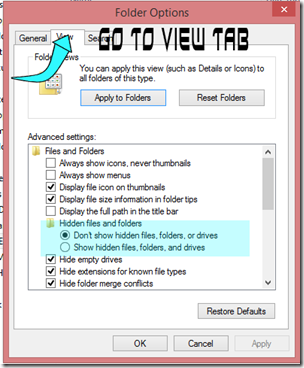
3. Now Go to View Tab and there under Hidden files and folder you will see two options.
Now choose them like this
1. If you wish that your hidden files not visible in window explorer and also not visible in search result than choose 1st option
2. If you wish that your hidden files visible in window explorer and also visible in search result than choose 2nd option.
image


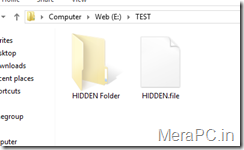
3. If you choose second option than you will see your hidden files like this.


Hidden Files


Okey so This is my post about how to hide a folder or a file. At the end of the post you know that if we have not enabled the option that hide hidden file than this trick not works. and your files and folder will seen in explorer and search result.
There is an another way to do this and than works perfectly. So i will recommend you to see that post Hide a file or a folder using command prompt.

Thanks for visiting !! 

How to Protect your WiFi [ Some tips ]

8:57:00 PM

Today we will talk on some basic tips that will be very useful for you to protect your Wi-Fi Hotspot.

Some it happens that you create a Wi-Fi network for your own purpose. may be you have a wireless network in your office or in your home. And Your are afraid of it getting hacked by other people (hackers)?
So here is some basic tips that can help you to make your wireless connection more secure.
So here it is.

1.Use WPA:

Many of the WI-Fi connections provides WEP (Wired Equivalent Privacy) for protecting your wireless network, but now a day it can be easily broken/hacked by the hackers by using a simple hacking suite within no time. So to protect your wireless network to the fullest you can use WPA (Wi-Fi Protected Access), and in this you have to make sure that WPS (Wireless Protect Setup) is disabled in the router’s settings. This is the Most Basic and Important Tip to Protect your Wi-Fi Network.

2.Use a strong & Secure WPA Password

Always make sure that the password that you select for your wireless network is long and random so that it can’t be cracked/hacked by any kind of hacker. And to test how strong is your password you can useCloudCracker service.

In this service you will be asked some data and that you need to feed in (not the password), and then it will try identifying your password (it’s done in the same way the hacker tries to find out your password), if it fails to find your password then you are ready to use your wireless network and if it finds out your password then you have no other choice left other than changing your password.

3.Separate Network for Guests:

If you are indulged in a business which allows visitors to use your Wi-Fi then it is sensible that you offer a guest network. By doing this the visitors will be able to connect to the internet without getting access to your company’s internal network. This will effectively help you in protecting your company’s information and also from any kind of malware and virus affecting your network or system.

4.Hide your network name

Whenever you get connected with a wireless network first and the foremost thing you need to do is change its settings, as according to the default setting wireless network’s name is broadcasted to make it easy to find and connect. But Service set identifier (SSID) can also be set to “Hidden” so that no one except you will be allowed to view the name of your wireless network. Hence it Helps to Protect Wi-Fi Network.
 
So there are basic Tips that can make your Wi-Fi network more secure.
Thanks for visiting !!


How to Access a Windows Desktop from Your SmartPhone or Tablet

1:29:00 PM


you can Access a Windows Desktop from Your SmartPhone or Tablet. IPads and android tablets or Smartphone can’t run windows app locally, but with this you can remote your windows desktop, even with a physical keyboard. Many apps has been developed and launched like Microsoft remote desktop app, TeamViewer for Remote Control, among which Microsoft app is mostly used for professional use while the other app can also be used for personal uses.

Microsoft’s remote desktop app :

This app has reduced the work load from one’s head of staying in the home and working all the day and cancelling the vacations and many more just because of the work info is available in your PC. With Microsoft remote desktop app, you can connect to your work resources and remote PC from anywhere you feel like working. This app is mostly used for business and professional use rather than the personal use.

Features of this app :
  • Access your desktop with your phones easily.
  • Rich multi-touch experience with remote desktop protocol (RDP).
  • It has an outstanding feature or technology, namely Network Layer Authentication which secure connection to your data and applications.
  • High quality video and sound streaming.
Review for this app :This app is friendly for the business related persons or for the professional use but not so friendly for the personal use.

TeamViewer for Remote Control:

This app is friendly for the personal use too no matter wherever you are, rather than controlling your own computer you can also remotely troubleshoot your relatives PC.
Features :
  • Access to computers (windows, Mac, Linux) is possible also during a telephone call.
  • Transfer the files from your PC to phone or from phone to PC.
  • Automatic quality adjustment.
  • Remotely reboot the computer.
  • TeamViewer free is for private use only e.g. to access or solve your or your friends computer problems.
All you have to do is Download an Install Teamviever on Your Desktop and Mobile, after installing on your smartphone you will have to login with the details that teamviewer window displays.
Other Options: Other than these two apps you surely have other options too if you are not friendly with both of them.
Splashtop: This is another popular remote desktop app that people reportedly has said that it is faster. But unfortunately this is not a free app as it may cost you around $20 at regular price. And to use it over internet you need to buy an additional “Anywhere access pack”. This app can be used or purchased if you don’t mind spending money or if you need a faster app to complete your work fast.
 
You can use this app for either personal or professional. It’s all depends on you. So hope you guys find this post useful.
Thanks for visiting !!


How to re arrange taskbar items

1:11:00 PM

Today i will teach you that how  you can re-arrange taskbar items. as default taskbar pinned items float to the left but we can put them in right or in the center like in MAC.
This trick works fine in window 7,8,8.1 i have not try it in window 95 but you can :-p.
So the steps are simple just follow me.

FOLLOE THE INSTRUCTION

1. First of all you need to create a folder anywhere but be careful Do not delete this or you can also use any folder.


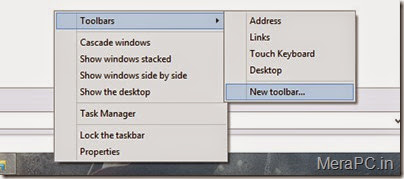
2. Right click on the taskbar  and click toolbars and then New toolbar. and also make sure then you have uncheck  lock taskbar.


adding new toolbar


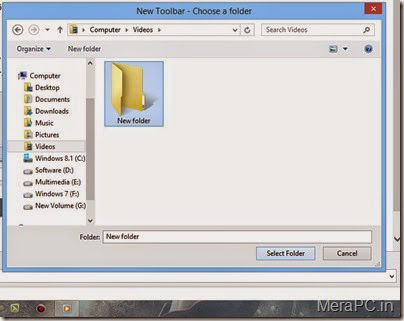
3. Now select any folder and make sure you don’t delete it.


Adding folder as a toobar


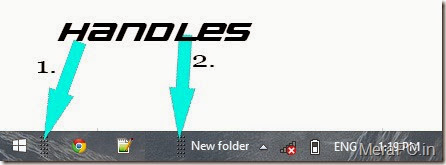
4. Now it should look like this . and  also you will see two handle like this


rearrange taskbar item step 4


5. Now here is the tricky part. drag the handle no. 2 to the left to very end and it will look like this


rearrange taskbar


6. And now put this handle(red) to the left and achieve you favorite position


4


7. for example mine look like this.


Taskbar after rearranged


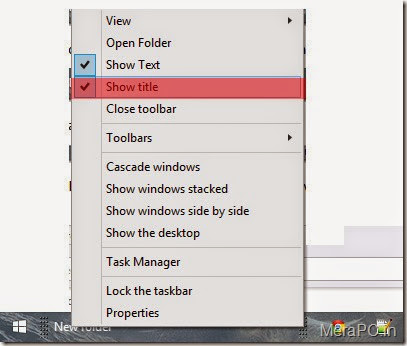
8. Now there is a problem you can see the new Folder name and there is no use of it so what you can do right click on it and uncheck show title


Hide the name of folder


and every thing is ready and now you can check lock the taskbar so you will not lose your setting by accidently.


Here is a look for the final product :-p


re arranged taskbar final
So guys that’s it and now you have taskbar items in middle or in right.
Hope you enjoy it and also found this useful and also share it to your friends.

Thanks for visiting !!

How To Make Transparent Folder WithOut Name and ICON

12:10:00 AM

Today in this post i'll show you how you can make a transparent folder without name and icon.

Follow These Steps :

1. First of all make any folder anywhere you want.

make folder

2. Now rename your folder and type ’255′ while holding ‘ALT’ button (ALT+255) and press enter to finish the renaming.
It should look like this

No Name folder

3. Now  Right click on folder and go to properties -> Customize -> Change Icon  and there is a 3 transparent icons. select one of them and hit on apply then ok.
it will look like this

customize settings

If you have done all the steps correctly it should look like this

Transparent Folder

It’s a awesome trick.. make sure you share it to your friends..
Thanks for visiting.!!

Tips for quickly access applications.

10:32:00 PM

Today i will show you or i mean i teach you a trick so you can quickly access your application.
I think you all know that creating a shortcut on desktop and then double click on it can be very quick to access the application. but some time we are some work and it take some time to minimize the application the application and then access the shortcut.
you can also add the application to your desktop context menu so you can easily access them.
but i personally like an another way. i am keyboard friendly and love to work with keyboard shortcut.
 
 
and trust me friends it is very fast to work with keyboard.
So lets come on the main topic

what about access the application directly by RUN command. for example probably you all know that you can open run command by pressing window key + R and then you can access calculator by just typing "CALC".

So what you can do is just paste the shortcut of the application is system32 folder (C:\windows\system32) and you can rename the shortcut as you like for example i paste a shortcut of Google chrome in system32 and rename it CHROME.

now i can access Google chrome by typing CHROME in run command.

So this is My trick i have paste so many shortcuts in system32 and i access my all application by just typing their name in run command.

NOTE: don't forget to rename the shortcut in system32. for example if the name of shortcut is "CHROME - shortcut" then you can can't access the application by typing "CHROME". you have to type "CHROME - shortcut " to access the application so be careful.

So friends this is my tips for quickly access application by just typing their in run command. Hope you all like and use it.

if you think this is very useful then you can say me thanks in comment :-) and also like our page on facebook. and if you think this is a awesome trick or tips then go ahead and subscribe to us on YouTube.
Thanks for visiting !!


How To Create a Wi-Fi Hotspot Without Any Software

10:31:00 PM


To day I am going to show you that how you can create a Wi-Fi Hotspot without any software.
First i would suggest you that if you want to know that what is Wi-Fi hotspot then click here.
anyways if you want to create a Wi-Fi Hotspot then you can use some third party software like connectify, virtual Router...etc
Or you can also create Wi-Fi Hotspot without using any software . and can share your internet connection.


FOLLOW THESE STEPS :


1. open command prompt and run as administrator. ( type cmd in start menu and then right click and click run as administrator or you can press Ctrl+Shift+Enter).
Open run command as administrator
2. Type this
NETSH WLAN SET HOSTEDNETWORK SSID=Networkname KEY=password MODE=ALLOW
and replace network name with your Wi-Fi Hotspot name and password with your favorite password (it should be greater than 8 charactor).
and hit enter.
Changing SSID and KEY
Now the you have successfully set a virtual Wi-Fi hotspot. now how to turn on it..?
Starting Wi-Fi Hotspot
to start Wi-Fi Hotspot in the command prompt (running as administrator) type this
NETSH WLAN START HOSTEDNETWORK
Starting Hotspot
if you look carefully in the above image you will see that first time when I tried to start the hosted network (Wi-Fi hotspot) I receive a error that a device attached to the system is not functioning. because i forget to turn on my Wireless adaptor ( or you can simply say Wi-Fi).
Now to turn off it type this
NETSH WLAN STOP HOSTEDNETWORK
Stoping Hotspot
And you have successfully stops your wireless network.
Now Pay attention here.
If you want to share your internet connection then also follow these steps:::
1. go to network and sharing center ( right click on the network in system tray and then click Open Network and sharing center).
Opening Network and sharing centre
Now at top left side click on Change adaptor settings.
Change adaptor settings
Now pay attention how you connect to internet using Wi-Fi or LAN cable.
I mean that which internet connection you want to share.
suppose you are connected to internet through LAN cable then right click on Local Network Connection
and click properties if you are connected through Wi-Fi then right click on Wireless Network Connection and click properties.
NOTE : Do not click on Wireless Network Connection 2
Properties for LAN adaptor
Now when a new window pop up
go to sharing Tab and then Check the small box just before allow other network user to connect through this internet connection.
and from the list select wireless network connection 2. and press ok.
How to share internet connection
Note : Make sure that you have not check the box in another adaptor otherwise you will receive an error if yes the uncheck the box in another network adaptor. error message will tell you that in which adaptor you have enabled sharing.
Note : sometime you will receive error while starting hosted network ( starting Wi-Fi Hotspot) like group or resources or not in ... in that condition reset Wi-Fi Hotspot setting ( in the first step netsh wlan set hostednetwork .......) or restart your pc and everything will be ok.

So that's it!
Thanks for visiting! 
 
Copyright © Mera PC. Blogger Templates Designed by OddThemes